Click the Fill button.
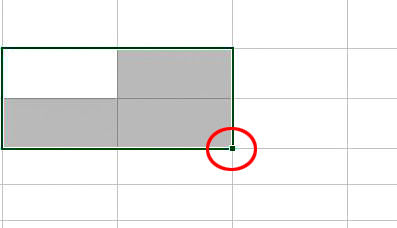 |
| Cross Hair & White Cell of selection |
Cross Hair/ Auto Fill Handle & White Cell
When you hover the mouse on the small Green solid square inside the Red Circle, mouse cursor transforms into '+' this plus sign is often called cross hair or auto fill handle.
Now one can left click and drag the cross hair (with left mouse button pressed) and fill the vertical or horizontal cells with the data that has been selected.
And white cell is the default active cell within the selection.
You can deactivate auto fill handle option.
- Click File.
- Click Options.
- Click 'Advanced'.
- Check out 'Enable Fill handle and cell drag & drop.'
With the help of the following video we are going to understand Down, Right, Up and Left and Across Worksheet (Greyed above) function. And also observe how cross hair / auto fill handle is used.
Explanations:
Across Worksheets... function works after the working is carried on a single worksheet. The required sheets can be grouped and the workings can be transferred to the other sheets in the group. So when group is created Across Worksheets function is highlighted.
Instead if we create group of worksheets beforehand and any workings in a single sheet will be automatically posted into other sheets in the group. Say a text or a formula can be transferred. But format wont be transferred. Of course any change of format in a single sheet after the group creation will be contaminated to other worksheets in the group. Try it yourself.
Auto Fill selected Cells
- Select the blank cells where you want to fill with a.... say text 'excelintoexcel'.
- After selection start writing excelintoexcel and you can see it is written on a cell (Default white) of the selection.
- Press Ctrl+Enter
- All the cells of the selection is filled with the text excelintoexcel.
Alternatively
You can achieve the same result by dragging with Cross Hair/Auto Fill Handle.
A simple video.
Alternatively
One can go with copy paste too.
Replacing the contents of the cell.
The best way to replace the content of a cell is to activate the cell and start writing the alternate or new content.
The cell automatically fills with the new content but the format of the cell will remain and applies to the new entry.
Editing the contents of the cell.
Best way to edit the contents of the cell is to replace with the new one. But if the content is textual say multiple line text.... then
- DblClick on the cell and the cell will activate with the cursor starts blinking inside the cell.
- Guide the cursor where you want to edit with Navigation keys in the key board.
Alternatively.
- Activate the cell.
- Press F2 in the key board.
- Guide the cursor where you want to edit with Navigation keys in the key board.
Alternatively you can also edit the content in the Formula Bar.
Moving selection inside the sheet.
Sometime it happens that we want to move the workings in a different region in the sheet.
- Select the content.
- Hover the mouse over the perimeter of the selection.
- Mouse cursor head is tagged with a Four Headed Arrow.
- At that instance Press and Hold left mouse button start dragging the selection in the required region.
- One can see that the content along with format is also shifted to the new region.
- Source region is left blank.
Some Data Entry Techniques
After entering a data into a cell when we press enter in the keyboard the cell pointer automatically moves to the next cell down (by default).
Now if you want to change this scenario.
Under File tab > click Options >
select Advanced
Under Editing Option
Uncheck the related check box under, 'After Pressing Enter, move selection' if one wants to disable this option. Or one can change the direction by selecting the drop down combo box.
Turning it off or on or change the direction is a matter of personal preference.
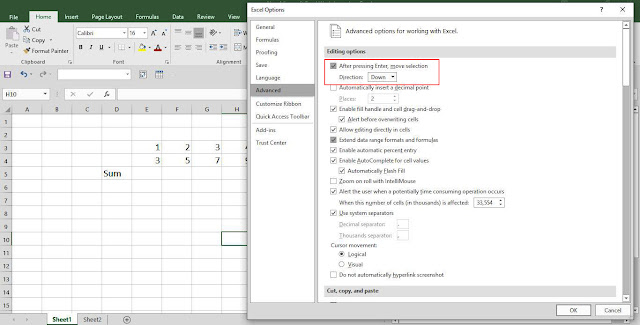 |
| Marked with Red Box | |
Instead of pressing Enter after entering data in a cell one can use navigation keys to move to the next desired cell.
Selecting a range of input cells for entering data
One can select a range of cells where the data entry is to be performed. After entering in the default white cell (of selection) if one presses Enter the cell pointer moves to the next cell inside the selection. You can skip a cell by simply pressing Enter again instead of entering anything in the cell. You can revert back to the previous cell by pressing Shift+Enter. This is to remember the cell pointer will remain inside the selection.
Entering decimal points automatically
If one is going to deal with lots of numbers with decimal places. Excel provides an easy approach to handle the situation.
If one specifies 2 decimal places and enters 2587 then excel interprets this entry as 25.87. Very easy and interesting.
By default this option is not enabled.
For enabling it.
- Under/Click File Tab.
- Click Option.
- Click Advanced.
- Tick the check box associated with 'Automatically Insert a decimal point'
Automate data entry with auto complete feature.
A very useful feature of Excel.
Easily you can enter same text in multiple cells.
- The cells should lie in the same column where the entry is already been made.
- There should not be any blank cells in between new entry and previous entry. There could be other entry but no blank cells.
- The feature takes into account the lower case or upper case too.
In the new cell if we start typing only the first few characters or alphabets of the text (previously written) excel automatically recognizes your try and give you an option to fill the cell with the previous entry. By pressing enter one can enter the previous entry in the new cell.
It enhances your accuracy of posting. You don't have to misspell.
Say when you enter the text 'excelintoexcel' excel remembers it.
Then when you start typing ex.. etc in the second entry excel provides you an option to fill the cell with 'excelintoexcel'.
You can disable this option of excel
- Click File tab.
- Click Options.
- Click Advanced.
- Check out the 'Enable Auto Complete for Cell Values'.


